By Michael Hartley
With the help of this simple magic square recipe, you can build a magic square of any odd size, say 3 by 3, or 5 by 5, or 7 by 7. If you want magic squares of other sizes, you should try the Even Order Magic Square Recipe, or the java applet that know how to make a magic square of any size...
There are many ways you could use this recipe to help teach kids math.
- In a series of lessons on magic squares, you could impress the class by writing down "on the fly" an order 11 magic square, after letting them spend a good amount of time trying to find one themselves
- You could teach them the recipe, then ask them to add the rows, columns and diagonals themselves - perhaps as an introduction to the concept of magic squares
- You could use the recipe to help create a big magic square puzzle
- You could ask them what happens if they change the recipe slightly - to explore whether or not they still get a magic square
- I'm sure you can come up with your own ideas too!
This recipe works to generate an odd order magic square - that is, a magic square with an odd number of squares in each row, column or diagonal. So if you want a four by four or a six by six magic square, I'm afraid you'll need a different recipe. Anyway, on with the show...
Step 1 - Preheat Oven
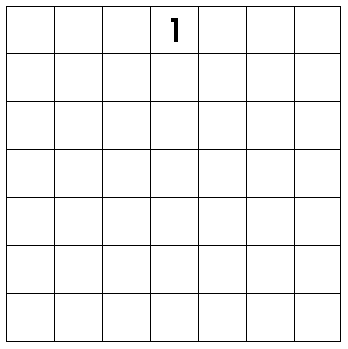
Start by drawing a grid of the desired size. If you like, you could print out the grids provided here. Then, you draw the number '1' in the middle of the top row of the grid. You should have something like what is shown below.
Step 2 - Prepare Ingredients
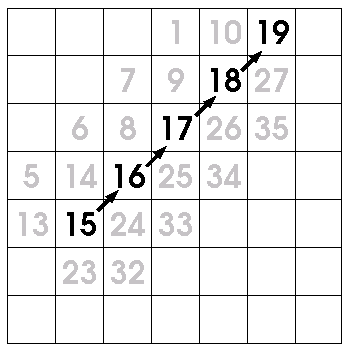
The basic pattern to this magic square recipe is simply to write the numbers in the square, starting with the '1' you've already drawn, and diagonally up each time. See the picture below and you'll get what I mean. After writing 15, I wrote 16, then 17, then 18, and so on. Each time, the next number was one column to the right, and one row above, the previous number.
Step 3 - Mix thoroughly
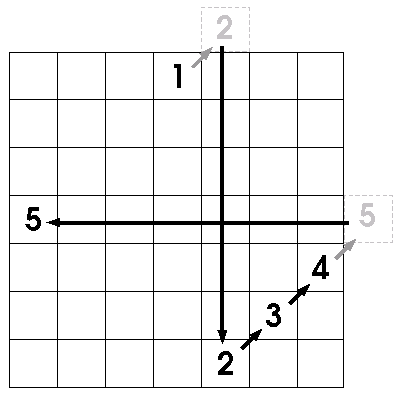
Of course, if you try that, starting from '1', you immediately have a problem. Moving diagonally up takes you off the grid! The solution to this is to let the grid "wrap around", so
- moving off the top brings you to the bottom, and
- moving off the right brings you to the far left.
- moving off the top right corner brings you to the bottom left corner.
See the picture below, and you'll get what I mean. The "diagonally up" rule means the 2 should be off the grid (as shown in gray). However, the "wrapping around" rule means the 2 is safely back on the grid again, and then you can continue drawing the 3 and the 4. Then, you need the "wrapping around" rule again when it comes time to draw the 5.
Step 4 - Bake well
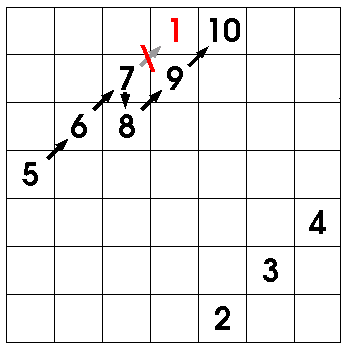
Soon, though, you'll come against a problem that can't be solved by wrapping around - namely, the "diagonally up" rule takes you to a grid cell that is already occupied! The picture below illustrates this problem, and the solution. The solution is simple enough - instead of moving diagonally up, just move one step straight down.
Step 5 - Serve Hot
Before you know it, your magic square will be complete! In the example used here, the very last number drawn is 49. If you tried to keep going, where would the next number be drawn? Amazingly, it would land back at the very place you started - the center of the top row, with the number 1.
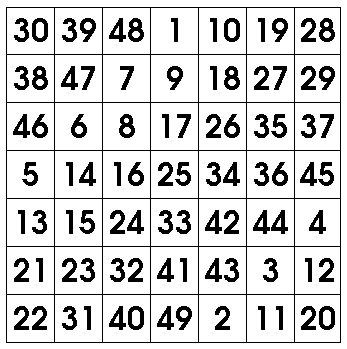
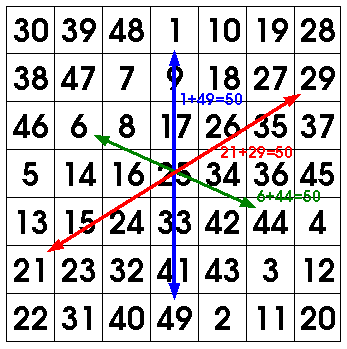
In the 7 by 7 magic square used in this example, every row, column and diagonal adds up to 175. It also has an interesting property, that opposite numbers always add up to 50. No matter what (odd) sized grid you start with, this will be true - that is,
- Every row, column and diagonal will add up to the same number, called the "magic number" of the square.
- Every pair of opposite cells will add up to the same number. I don't know what this number should be called, so I'll call it the "opposite number". See the picture below, to see what I mean.
When you follow this magic square recipe, you'd surely like to know whether it's worked out al dente or not. So I give below the values you should get for the "magic number" and the "opposite number" for different sized squares, and also the number you should see in the middle of the magic square.
- For a 3 by 3 magic square, the magic number is 15, the middle number is 5, and the opposite number is 10
- For a 5 by 5 magic square, the magic number is 65, the middle number is 13, and the opposite number is 26,
- For a 7 by 7 magic square, the magic number is 175, the middle number is 25, and the opposite number is 50,
- For a 9 by 9 magic square, the magic number is 369, the middle number is 41, and the opposite number is 82,
- For a 11 by 11 magic square, the magic number is 671, the middle number is 61, and the opposite number is 122,
- For a 13 by 13 magic square, the magic number is 1105, the middle number is 85, and the opposite number is 170,
- For a 15 by 15 magic square, the magic number is 1695, the middle number is 113, and the opposite number is 226,
- For a 17 by 17 magic square, the magic number is 2465, the middle number is 145, and the opposite number is 290,
- For a 19 by 19 magic square, the magic number is 3439, the middle number is 181, and the opposite number is 362,
- For a 101 by 101 magic square, the magic number is 515201, the middle number is 5101, and the opposite number is 10202,
- And if you could ever actually write it down, for a 1001 by 1001 magic square, the magic number would be 501502001, the middle number would be 501001, and the opposite number would be 1002002!
Yours, Dr Mike.